10 Easy Ways to Improve Your Workflow for Onboarding New Clients
Table of Contents Show
Do you ever feel like you're starting from scratch every time you bring on a new client?
You're not the only one.
Having a smooth process to welcome and onboard new clients is important for building strong client-centric relationships and running your business effectively.
In this post, I'll show you the basic steps to create a great process for bringing new clients on board. This’ll help you save time, make your clients happy (hello referrals!) and set your business up for success.
Why Your Client Onboarding Process Matters
A good onboarding process does more than just make a nice first impression (though that's definitely important!).
It makes sure:
everyone knows what to expect from the beginning
gathers all the important information quickly and easily
and shows clients that you're organized and professional.
When you do this well, things will just run smoother. YOU will stress less, and your clients trust factor will grow way faster.
A well-organized process saves you time and brainpower.
You won't need to scramble to remember what to do next or search for that one important piece of info you forgot to ask about. Plus, it gives all your clients the same delightfully smooth experience. When you treat every client the same consistent and client-centered way, you’ll look more professional and with-it, and your clients will notice and be happy to sing your praises.
Need help getting your business basics in order? Grab you free checklist here ↓

Creating Your Onboarding Process
Now that we know WHY it's important, let's talk about HOW to create your client onboarding process.
Making a good onboarding process doesn't have to be hard, promise!
Here's how to break it down:
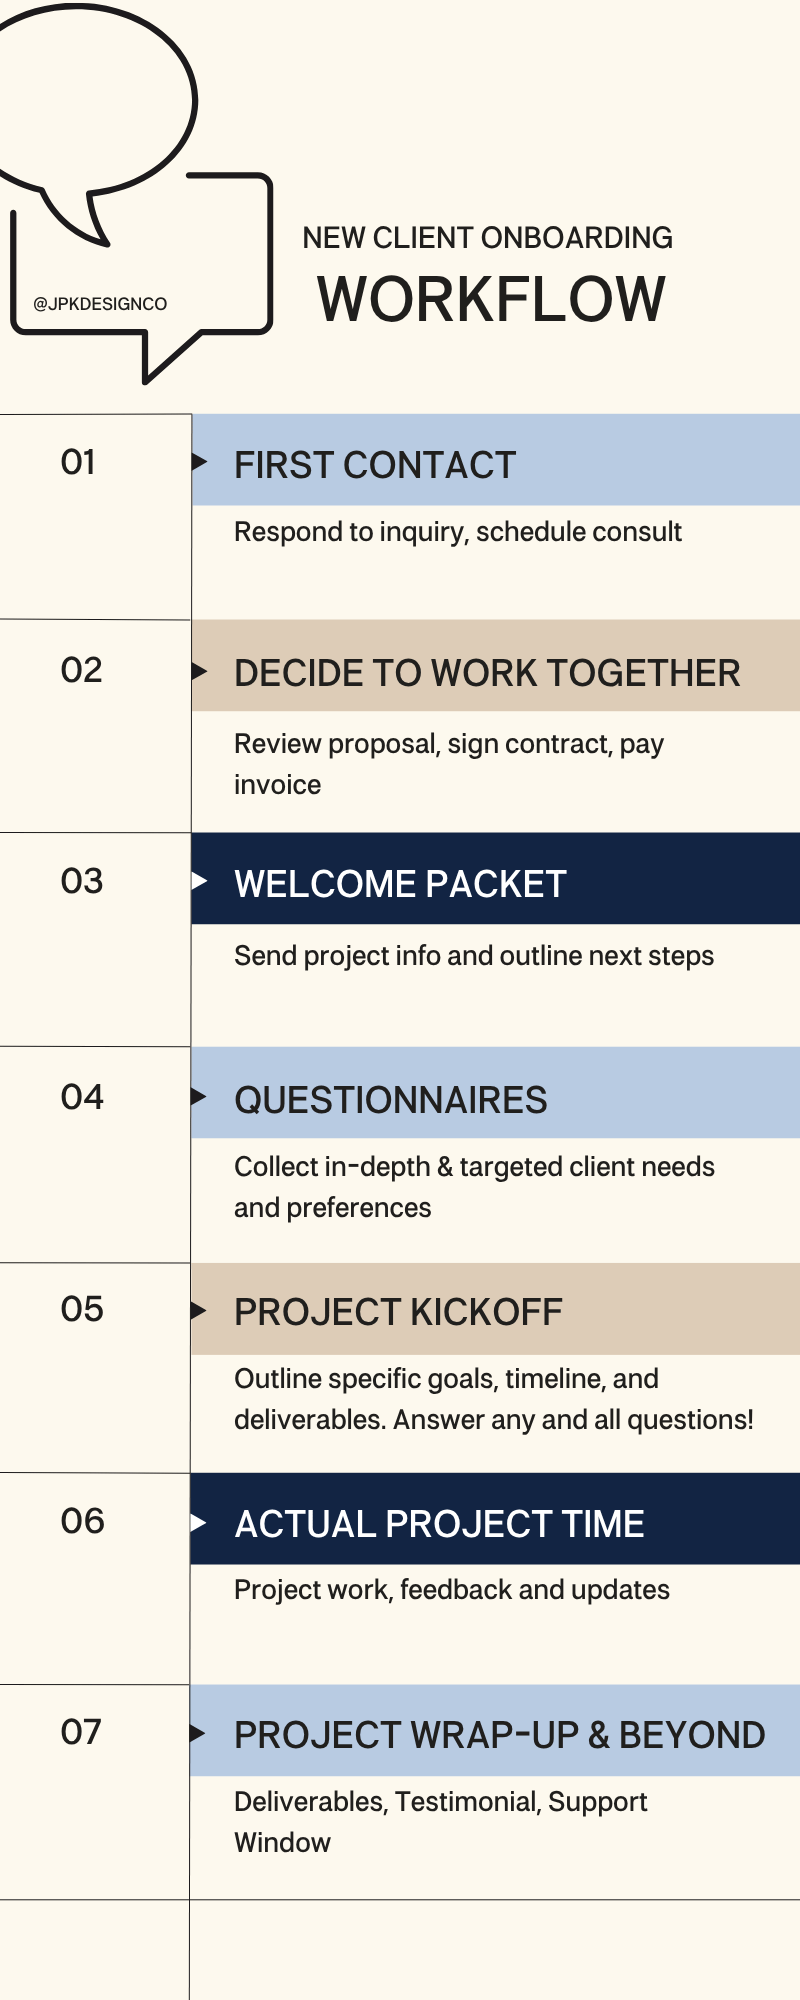
1. List All the Steps
First, write down all the steps you want to include. Grab a pen and paper (or use your fave tool like Asana, ClickUp, or Notion) and list EVERY step from when a client first contacts you to when you start working together. Don't worry about making it perfect—we can improve it later.
2. Create the Tools and Forms
Next, create the tools and forms you'll need. Think about welcome packets, questionnaires, contracts, and project schedules. Having these ready to go will save you lots of time in the future.
3. Set Up Your Tech Stack
Now, pick out the tools that'll make your life easier. Think about what you need—maybe it's a scheduling app, a project management tool, or something to automate your emails. Don’t go overboard, just choose what works for you and your business style.
4. Set Up an Automated Welcome Email Sequence
Time to zhuzh up your inbox game. Create a series of welcome emails that'll automatically go out to new clients. Include all the important info they need to know, and maybe a little something to make them feel special. This'll save you tons of time and make sure no one falls through the cracks.
5. Implement Easy Online Scheduling
Let’s face it, nobody likes the back-and-forth of trying to find a good meeting time. Set up an online calendar where clients can book their own slots. It’s super convenient for them and frees up your time for more important stuff.
6. Create a Centralized Client Hub
Give your clients a one-stop-shop for all their project needs. This could be a page on your website, a shared Google Drive folder, or whatever works for you. The idea is to have one place where they can find everything they need without having to dig through old emails.
7. Design a Client Questionnaire
Get to know your clients better with a thoughtful questionnaire. Ask the questions that'll really help you understand their needs and goals. This info will be gold when you’re working on their project.
8. Plan a Project Kickoff
Start things off right with a proper kickoff. This could be a call or a meeting where you go over all the important details of the project. It’s a great chance to get everyone on the same page and build some excitement for what’s to come.
9. Set Clear Milestones
Break the project down into manageable chunks. Set clear milestones so both you and your client know what to expect and when. This keeps things moving and helps prevent any last-minute panic.
10. Create a Wrap-Up Process
End things on a high note with a solid wrap-up process. This might include a final meeting, gathering feedback, or sending a thank-you note. It’s also a great time to chat about any future work or referrals.
Remember: You don’t have to do all of this at once. Start with one or two steps that feel doable and go from there. The goal is to make your workflow smoother and your clients happier—and trust me, both those things are totally worth the effort.
Making Your Process Easier (with Tech Tools)
Want to make your onboarding process even better?
Technology can be your best friend here. Pick the right tools that work well with what you're already using. See the end of this post for a list of some of the most popular and tools that solopreneur business owners and freelancers use.
Start Small and Grow from There.
Don't try to change everything at once. Begin with one or two main tasks and add more later.
Here are some tips to get you started:
Set up automatic welcome emails that tell clients what to do next.
Use online calendars so clients can easily schedule calls with you.
Create a special portal where clients can find all their documents (this can be on your website, in Google Drive, Notion, Motion.io, etc)
Frequently Asked Questions
Q: How long should it take to get a new client started?
A: Try to be quick but thorough. For most businesses, 1-2 weeks works well. For me personally, I try to have everything booked, contract signed, deposit paid, and project date confirmed within 1 week.
Q: What if a client doesn't do the onboarding tasks?
A: Follow up kindly but clearly. Let them know that these steps are important for the project to go well. You might consider incorporating a clause in your contract that includes a rescheduling fee if the client isn’t ready.
Q: Can I change the process for different types of clients?
A: Of course! Create a basic process, then add special steps for different kinds of clients or services.
Q: How do I create an effective client onboarding process?
A: Start by mapping out all the steps from first contact to project start. Create necessary tools and forms, set up your tech stack, and refine based on client feedback.
Q: How do I create an onboarding workflow?
A: List out ALL your steps, create templates and forms, choose your tools, and set up automations. Then its a matter of just testing your process and adjusting as needed.
Q: How can I improve my customer onboarding process?
A: Regularly gather client feedback (feedback and testimonial forms are a great way to do this!), look for bottlenecks, automate where possible (!), and schedule regular check-ins with your business.
Q: How do I create an effective onboarding process?
A: Focus on clarity, consistency, and client experience. Use the right tools, provide clear communication, and make sure each step adds value to the client relationship.
Helpful Tools For Client Onboarding
(Some of these tools are affiliate links, marked with an asterisk. If you purchase through them, I may receive a small commission at no extra cost to you.)
Project Management & Collaboration
Asana - EASY to use and versatile project management and team collaboration tool
Notion - All-in-one completely customizable workspace for notes, tasks, and collaboration
ClickUp - More robust customizable project management platform
Google Drive - (you know what this is, but…) Classic cloud-based file storage and real-time collaboration suite
Client Management
HoneyBook* - Ridiculously comprehensive client management system for small businesses - you can schedule calls, send proposals, automate messages, invoice & take payment, and use contact forms. (This is what I use and I love it. Get 25% off your first year* with my affiliate link!)
Dubsado - All-in-one business management system like HoneyBook. More robust, I hear, but also more complicated to get the hang of.
Moxie* - New Kid on the Block. Super popular and growing in features all the time. (Get 30 days free* with my affiliate link!)
Data Organization & Forms
Google Forms - Free way to create forms to get information from your clients
Airtable - Flexible database and spreadsheet hybrid. I’m just getting into Airtable now, but it’s a sort of all-in-one form builder, organizer, and data collection system.
Tally* - Simple form builder for quick data collection. GREAT way to get info from your clients, and super customizable. Their free level is incredibly robust!
Scheduling & Calendars
Cal.com - Open-source scheduling platform.
TidyCal - Minimalist scheduling tool for appointments.
Calendly - User-friendly scheduling platform.
Acuity Scheduling - Squarespace’s own integrated scheduler.
Automations
Zapier - The OG of app connections.
Make (formerly Integromat) - Visual automation for the flow-chart lovers out there.
Pabbly Connect - The new kid on the block.

